How To

The Ultimate Beginner’s Guide to Turntables and Vinyl

You’ve decided to get a turntable and some vinyl records in order to enjoy music differently. Congratulations, this is a pretty cool hobby. Warning, this could turn into an expensive rabbit hole. In this post I will cover everything you need to know about purchasing your very first record player setup.

Before we jump into the gear such as turntables, speakers and amps we need to cover a few important topics. Knowing the answers to these questions will help you make the right decision on the proper audio gear setup for you.


New Gear vs. Old Gear

When I talk about vinyl records and record players, a lot of people give me a rather skeptical look. “What do you mean new records, Sasha?” or “Wait, they still produce turntables?”. The answer to these questions is YES, of course.

Although most people associate records with an old music format from the 80’s (70’s, 60’s…etc) the popularity of this format has been seeing an incredible growth in the past 15 years. While only a few hundred thousand records were sold in the U.S. in 2005, this number was closer to 27.5 Million units in 2020. More and more artists release their music on vinyl. Naturally, more and more companies produce brand spanking new equipment to play these records.

Most people who are purchasing their very first turntable opt for brand new gear, simply because it’s accessible. That being said, there is nothing wrong with using a deck or speakers or amplifier handed down to you by your parents or grand parents. I found some amazing “old” gear for incredibly low prices. You can sometimes snag a record player for $20 at a yard sale or a thrift store to only find out that the same unit goes for $400+ on eBay.

Main issue with purchasing old equipment is that it might be broken and repairs can be very costly, depending on the issue or brand. If you want to purchase a hassle-free turntable set-up then I suggest buying brand new, with warranty. If you want to take your time to learn what to look for then finding vintage gear could be a lot more rewarding. Personally I always oped for the latter.

So here is the first question you need to answer: Do you want new vinyl gear or old/used?

Vinyl Gear Costs

Transrotor Artus FMD
Source: transrotor.de

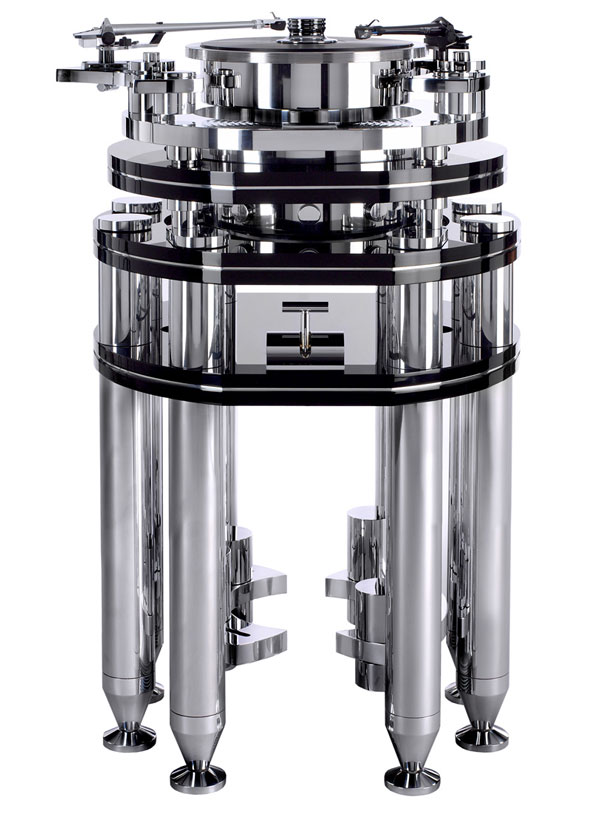
You can spend a few hundred dollars or a few hundred thousand dollars on your turntable set-up. For example, the Artus FMD turntable pictured above retails for about $150,000. You can find speakers and amplifiers in the same price range if you really want to. I would assume that most people reading this guide want to spend a little less than that.

Most good quality (new) turntables will set you back around $200-$400. If you don’t have powered speakers or some kind of audio set-up, you would need to spend another $100+ on speakers. And if the record player you want to buy doesn’t come with an inbuilt pre-amp, that would cost an extra $50+. More on that later.

So far we’re looking at at least $400 for a decent set-up. You can certainly find an “all-in-one record player” solution for under $100 but I don’t recommend that. I’ll explain why in the Turntable section of this post. These are the prices for brand new gear. As mentioned in the previous section, you can find used/old gear for a lot less money if you’re not in a hurry.

The second question is: How much money are you planning to spend on your audio set-up?

Most Popular New Turntables

  1. Audio-Technica AT-LP60

Audio-Technica’s AT-LP60 turntable is a very appreciated record player among beginners. The quality/price ratio is what makes it a popular choice.

This automatic belt drive turntable comes with an inbuilt phono preamp so you can simply plug it into your powered speakers or sound system. The ATN3600L cartridge comes with a replaceable stylus which is a big step up compared to many sub $100 tables.

At a price range of $120-$150 USD you will get a decent sound quality without braking your bank.

Check current price here.


2. Audio-Technica AT-LP120X

Audio-Technica AT-LP120X is quite a big step-up from the previously mentioned LP60. This record player features a high torque direct drive motor. If you’ve heard of direct drive tables being loud – it won’t be the case with the AT-LP120x, its motor is silent.

This is a fully manual turntable so I won’t suggest falling asleep while it’s spinning.

If this turntable looks familiar to you it’s because it is designed after the world famous Technics SL1200.

The AT-LP120XUSB comes with a switchable phono preamp meaning that you can use an inbuilt preamp and simply plug into a sound system or powered speakers but you can also use your own external preamp if you so desire. You can also plug it into your computer and digitize your vinyl collection, if that’s something you want to do. Installing a proper cartridge and stylus will also allow you to DJ with this turntable.

At about $400 USD it certainly isn’t the cheapest option although 3 times cheaper than the similar looking SL-1200 MK7.

Check current price here.


3. Fluance RT81

Fluance RT81 gained a lot of popularity not only because of its quality but also because of the minimalist design. This belt drive turntable is semi-automatic meaning that the platter will start spinning once the stylus reaches the end of the record. The tonearm however will not lift up and move to its resting position, just something to keep in mind.

Fluance has been building its reputation in the world of high fidelity turntables since 1999.

The Fluance RT81 comes with a familiar Audio Technica AT95E cartridge and an inbuilt preamp.

At around $250 price tag, no wonder so many people decide to go with Fluence.

Check current price here.


4. Pro-Ject Debut Carbon EVO

Pro-Ject Debut Carbon EVO

Pro-Ject Debut Carbon EVO is probably the best audiophile turntable you can get for under $500 USD.

This belt drive turntable is hand crafted in EU and promises a high quality record player that will last for generations. Pro-Ject is all about the quality of the sound, that’s the reason why they’re using a stiff but lightweight carbon tonearm 1.7kg (3.5lbs) platter and electronically controlled playback speeds (33, 45 and 78 RPM).

The US version of Debut Carbon Evo comes with a more expensive Sumiko Rainier cartridge while other countries get the Ortofon 2M Red.

This turntable does not feature a preamp so besides the initial $500USD you’ll also need to find an external phone preamp. The company suggests their own Pro-Ject Audio Phono Box.

Check current price here.

You can also check out our guide to best turntables under $500 in 2021.

The Purpose Of Your Set-up

The Looks

You know that you will be spending money on your turntable set-up and vinyl records. Choosing the perfect audio set-up for you will not only depend on your budget but also on what you want to do with this set up.

A tiny thrift store a few blocks from me had a 40$ suitcase-style record player on display along with some records and a “NOT FOR SALE” sticker. That shop used the record player as part of their decor and obviously didn’t care for the quality of that turntable since it would never be used to play records.

If you’re looking to spice up your decor, you can also find a similar turntable for under $50. However even for that purpose I would recommend finding an old turntable from the 70’s or 80’s. Old gear definitely looks much better than brand new cheap plastic players. At least it looks better to me.

Belt Drive vs. Direct Drive

Turntables fall into 2 categories – Direct Drive or Belt Drive.

A belt drive turntable has a small rubber belt attached to the player’s motor and the platter. This belt might stretch, dry out and fall apart with time. However, replacement belts are cheap and very easy to change. Belt drive turntables, reportedly, produce better sound quality as the elastic belt has the ability to absorb vibrations and shocks caused by the motor and other sources.

Belt driven tables have a less accurate playback speed and longer starting times.

A direct drive turntable has its platter attached directly to the motor. Direct Drive player has a more accurate playback speed than a belt drive. A direct drive turntable often has more torque than a belt drive so it can start up and stop much faster.

Reliability and durability are the main reason why many people opt for a direct drive turntable. If you ever wanted to DJ with turntables – you’ll need to go with direct drive.

At the moment of writing this I own a direct drive turntable as well as a belt drive turntable. I can’t tell you which is better because they play my records beautifully. If I had to purchase a different turntable right now, I wouldn’t waste my time on deciding between a belt drive or a direct drive.

Manual, Automatic or Semi-Automatic

Listening to records is not the same as listening to your favorite Spotify list. When I play records, I call it Active listening. Mixing your playlists takes a lot of effort as typically you will need to change the record after each song. Take the record out of the sleeve. Put in on the turntable. Clean the dust with a brush. Play a song. Put the record back in its sleeve. Take another record and so on. You may listen to the whole album but even then, after 20ish minutes of side A you’ll need to flip that vinyl to hear the side B. Active listening.

Besides simply flipping your vinyl record, different turntables will require a different level of involvement.

An automatic turntable will allow you to simply press the PLAY button and the music is on! The tonearm lifts up automatically while the platter starts turning, moves to the beginning of the first track and slowly goes town. Once the stylus (needle) reaches the last note of the last track, the tone arm lifts up, moves back to its resting place and the platter stops turning.

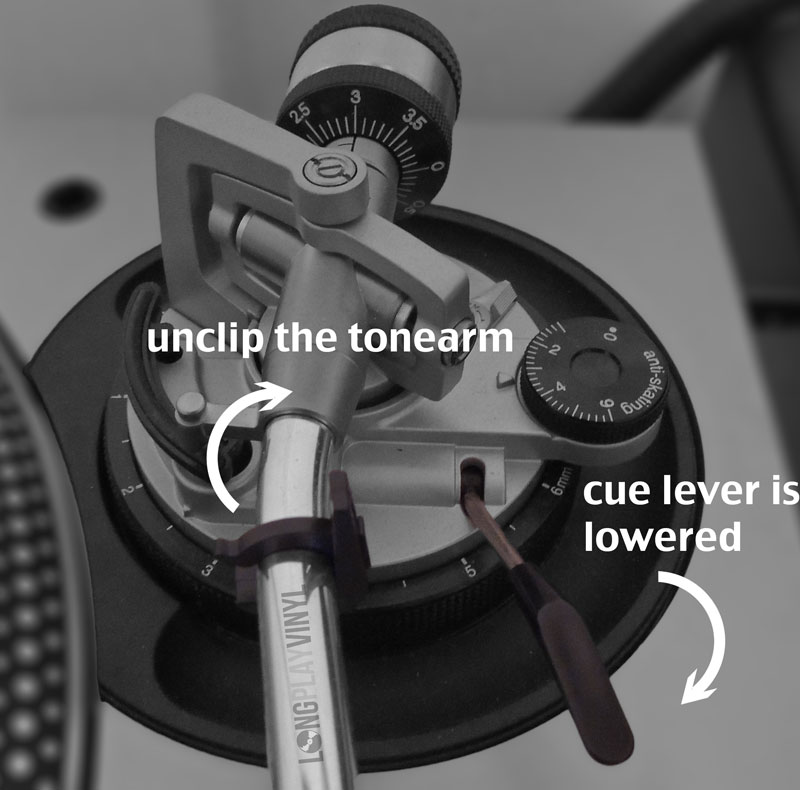
A manual turntable will get your platter turning if you press on PLAY (or START) but that’s all. No music. In order to hear the music you will need to lift the tonearm and carefully move it to the outer edge of your record. Press play and the platter starts spinning. Then carefully push on the lever which lowers your tonearm and sits the stylus on the spinning record. Once you reach the end of the vinyl record you need to pull that lever to raise the tonearm. Move the arm back to its resting position and press the stop button.

In this scenario you need to make sure you lift the stylus off the record and not allow it to jump around needlessly, which may cause damage.

A semi-automatic turntable is usually some kind of hybrid between the manual and automatic. Often it would require you to manually place the stylus at the beginning of a listening session but it would automatically bring the tonearm back at the end of the record.

The main advantage of the automatic turntable is that it basically does the work for you and all you need to do is press a single button.

If you’re new to turntables and go with the manual option you might miss the edge of your record and drop the cart on your record, causing scratches. You may damage your stylus as well if you’re not careful.

Personally I prefer the manual style turntables because I enjoy being involved in active listening. I enjoy lifting the tonearm and being very careful while trying to place the stylus in the groove of the record. I also believe that since there are less mechanisms on my player – there are less chances of something breaking.

Next set of questions: Do you want a record play just for the decor or do you want a good quality unit to play music? Do you want a belt drive or direct drive? Do you want an automatic or manual turntable?

Turntable Audio Setup

Let’s say at this point you’ve decided that you want to spend no more than $350 on your turntable. You want a brand new unit, you want your turntable to be manual and direct drive. Great, this narrows down your choice.

At this point we need to talk about other components of your audio setup.

Phono Preamp for Turntables

The stylus on your turntable produces the audio signal, referred to as PHONO signal. This signal is rather weak and too low for the speakers. In order to correct this you need to you a preamp. A preamp, also called a phono preamp, phono stage and RIAA stage converts the phono signal into a Line Level signal. That’s the kind of signal your speakers need.

The good news is that many new turntables come with an inbuilt preamp. This information will usually be advertised on the packaging and/or listing of the record player that you’re purchasing.

If your turntable doesn’t have an inbuilt preamp – you can purchase one for $50-$100, or more, depending on the quality.

Most of the vintage stereo receivers/amplifiers also have an inbuilt amp for your turntable. The easiest way to find out if your receiver has it, look at the back panel. If there are RCA connections labeled PHONO – then you’ve got a preamp.

Phono Inputs on a receiver/amplifier
Phono input on an old receiver

Most DJ mixers also have the phono preamp and you can see the RCA inputs for them.

Phono inputs on Pioneer DJM900 NXS Mixer
Phono input on my Pioneer DJM900 mixer

To summarize, if your turntable has an inbuilt preamp or if you are using a DJ Mixer or an old receiver with PHONO inputs – you do not need to purchase a separate preamp. If your turntable doesn’t have an inbuilt preamp and you aren’t using an amplifier or a mixer that has PHONO inputs then you will need to purchase a preamp.

Why do some turntables come with inbuilt preamps and others don’t? The main reasons are cost and versatility. Adding a preamp into a turntable increases the price of the unit and some manufacturers prefer to not spend that money. Those manufacturers who decide to include a preamp go for a cheaper option meaning that the user gets an okay preamp but not necessarily a high quality part.

Many hi-fi enthusiasts prefer to use an external preamp because there is an incredible amount of options. Most hi-fi audio manufacturers will not include a preamp for that specific reason, knowing that their target audience will end up purchasing a completely different external preamp anyway. That being said, most new turntables that do come with an inbuilt preamp usually have a switch allowing you to disable the internal preamp in order to use an external unit.

Speakers for Turntables

Speakers are an essential part of your audio setup. If you’ve spent a decent amount of money on your turntable there is no reason to cheap out on the speakers. You might have the world’s best record player but if your speakers are horrible, your sound will be horrible.

If you are plugging your turntable into an existing sound system or a DJ mixer – I would assume you already have speakers. If not then you’ll probably have to purchase a set.

Picking the right speakers for you is another potential rabbit hole and deserve its own post on the blog. However there are basic guidelines and product suggestions that you can follow. I am a big fan of using passive floor standing speakers and a vintage receiver when it comes to vinyl. However I usually recommend a completely different setup to those who are just starting with vinyl.

Powered speakers seem to be the most popular choice in our time and age. Most powered speakers for home sound great, don’t take up much space and are quite affordable.

Popular Speakers For Turntables

  1. Edifier R1280DB

Edifier R1280DB became the go-to speakers for beginner turntable enthusiasts because of their low price and decent quality.

Side panel control lets you adjust the EQs, Bluetooth capability is great for connecting your phone and the remote control is definitely a plus. If you’re on a budget or if you aren’t yet ready to invest a lot of money into your new vinyl hobby, these bookshelf speakers are a great choice.

3,000 reviews on Amazon alone speak for the popularity of these speakers. The cost is usually under $130 USD. You can the same model but without the BT connectivity for around $100.

Check for current price here.


2. Edifier R2000DB

The R2000DB by Edifier are another great set of speakers for your turntable and for your home in general.

They are a little bigger and quite a bit more powerful than the R1280’s. Of course they come at a higher price tag at about $250 USD.

Check current price here.


3. Audioengine HD3

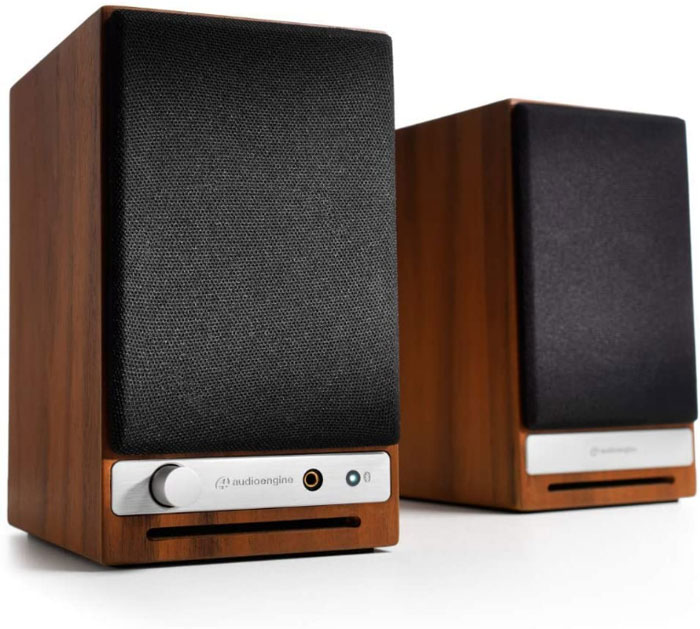
HD3’s by Audioengine are small but very capable powered speakers. They’ll work with pretty much anything, your turntable, computer, phone and everything in between.

The price tag is around $350 USD at the moment of writing this.

Check current price here.


4. Klipsch R-51PM

These R51-PM powered speakers are made by Klipsch, should I say any more? This company has been making speakers since 1940’s, they definitely know what they’re doing.

The R51-PM sound great. Although a little bigger than other speakers mentioned in this post, they are still bookshelf size and won’t take up much room in your house. The typical price is usually under $450 USD.

Check current price here.


Vinyl Gear Recap

Throughout this turntable setup guide I’ve asked you several questions. Knowing the answers to these questions will certainly help you pick an audio setup that’s right for your budget, your ears and your heart. Let’s run trough them again.

Do you want new vinyl gear or old/used?

Buying new is a lot easier than buying old. You get a warranty and you can order your gear online with just a few clicks of a button. Buying vintage or used gear could be more rewarding but there is always o chance of getting burned. Driving through yard sales and browsing through thrift shops could net you with a very cheap set up. However you can also end up buying broken gear that would cost too much to repair. I’m always on the hunt for vintage and used gear, as you probably figured out if you watched my $50 turntable setup video.

How much money are you planning to spend on your audio set-up?

Let’s be honest, good quality audio equipment is not cheap. Vinyl records aren’t cheap. This isn’t a cheap hobby and you need to be ready for it. Setting a budget for your vinyl setup will help you not to splurge and more importantly it will help you narrow down your choices. One of the main reasons I started in this hobby with used gear is simply because I couldn’t justify spending a thousand dollars on audio gear without knowing if I would actually enjoy it. There is always a possibility of upgrading later on.

What will you do with your turntable setup?

If you want a turntable for the “cool” factor then you could on with whatever looks best in your opinion. If you want to DJ with your turntable you’ll need to make sure you’re to go with Direct Drive models (and don’t forget you will need to purchase 2 decks). Are you an an audiophile? Then you’ll need to really look into belt driven units as they are generally quieter. Maybe you want to expose your kids to an ancient music format – in that case I would recommend purchasing a cheap unit so you wouldn’t feel bad when they break it.

Which parts of the turntable setup do you already own?

If you already have a DJ mixer or a stereo receiver with PHONO inputs then you don’t need to worry about a turntable having (or not having) an internal preamp. If you do not own any of that then you’ll have to make sure to go for a record player with an inbuilt preamp or budget for buying an external preamp. Now if you’re starting completely from scratch and decide to go with a turntable that features an internal preamp – you still need to budget for a decent set of powered speakers. It’s important to note that passive (not powered) speakers will require a separate amplifier, this is why I recommend going with powered speakers.

What NOT To Buy

When it comes to turntables, I highly recommend staying away from “all-in-one” and “suitcase” style turntables. The ones you find at Walmart for $49, there is a reason they only cost $49. These turntables are made of very cheap materials. They do not keep constant speeds, they do not produce good sound and they will most likely damage your records since they are very unbalanced.

Simply put, if you’re paying $30 for a new vinyl record why risk ruining it with a low quality turntable? At the very least you should be aiming for the AT-LP60 I mentioned earlier.

If you’re on a very tight budget then I highly recommend hunting for used vintage gear that might cost under $100 but will sound as good as $400+ new gear.

Turntable Accessories

I know that you’re very excited about finally getting to spin some records on your brand new turntable. However there are a few important accessories that you should consider in order to fully enjoy the experience. Yes, more money to spend. Remember I told you this hobby could turn into a money pit? In this section I’ll cover the accessories that you actually need if you want your gear and your records to live a long and happy live.

Vinyl Record Brush

carbon fiber brush on a record

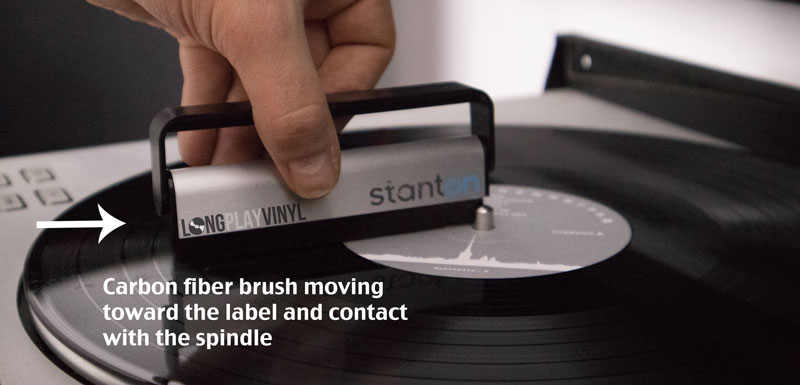
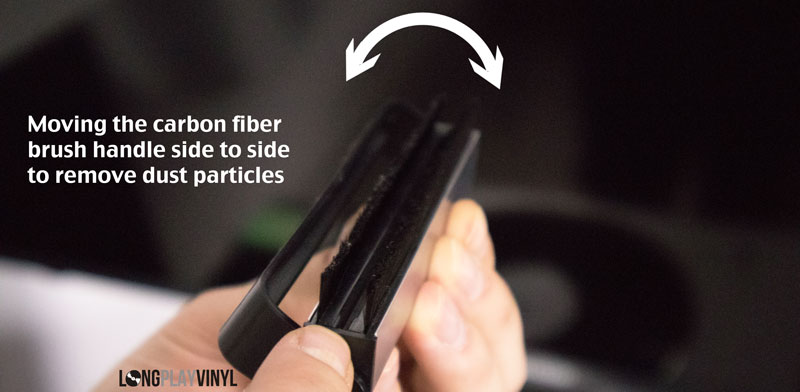
A vinyl brush is a very cheap accessory but it is an absolute must. Vinyl records are dirty, often even if they are brand new. I received brand new releases that had not only dust but also tiny pieces of Styrofoam on them. How did the Styrofoam get inside of a sealed album will remain a mystery to me but it happens.

Dust and other dirt causes pops and crackles during playback. More importantly these contaminants will eventually destroy your stylus and you’ll need to purchase a new one much sooner than you should. You must always clean off your records before “dropping the needle”. It only takes a few seconds.

Remember that a brush is only used to remove dust and other light contaminants, Do not use a brush to wipe of finder prints liquids and other ingrained contaminants. There is a detailed post (and a video) explaining how to properly use a carbon fiber brush on your vinyl records. Such brushes usually cost under $20.
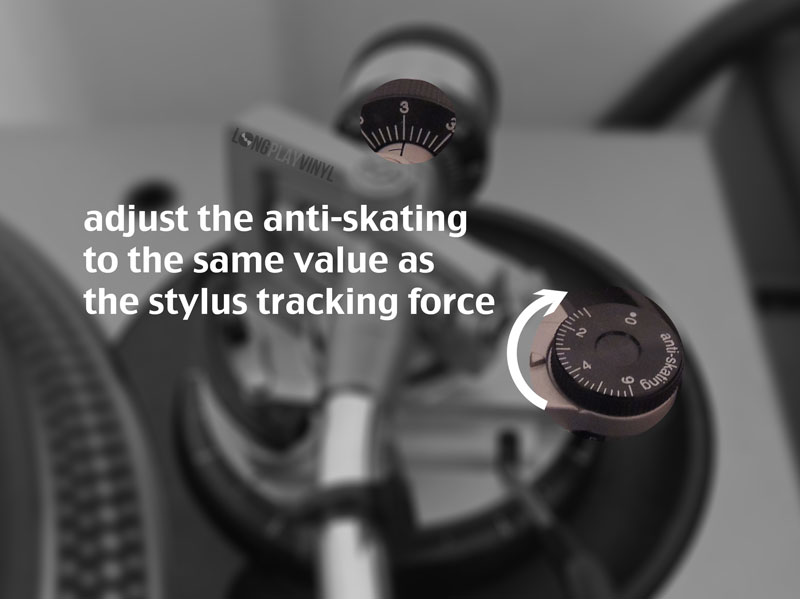
Stylus Scale

Stylus force scale

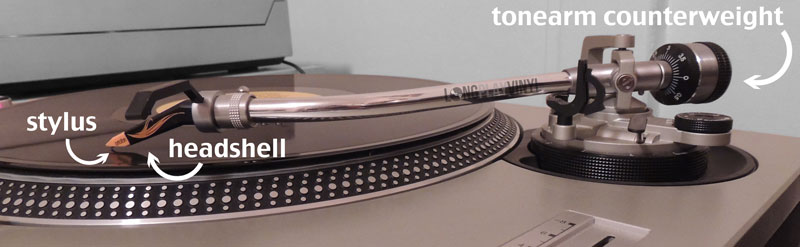
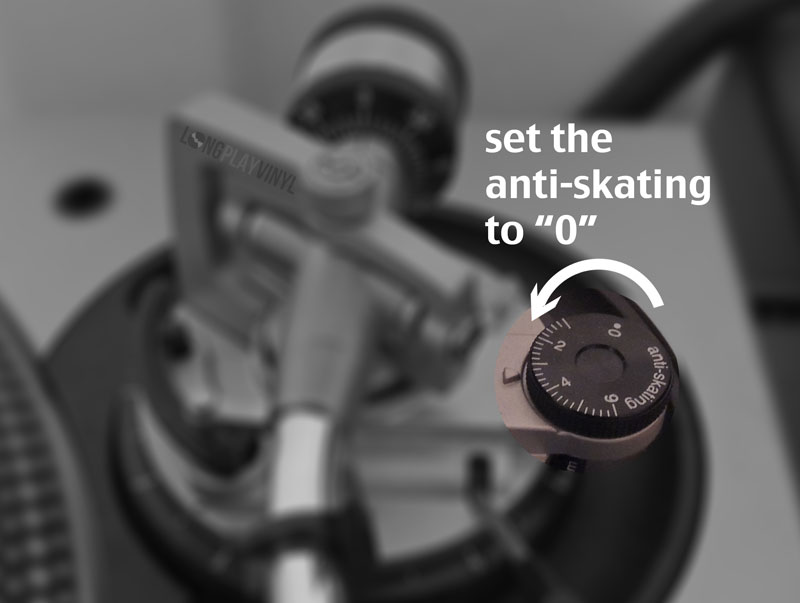
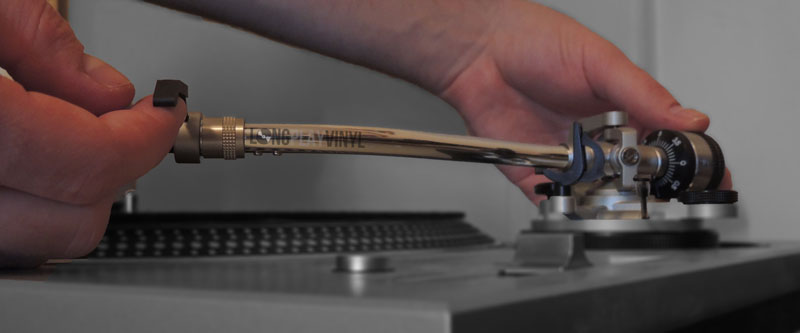
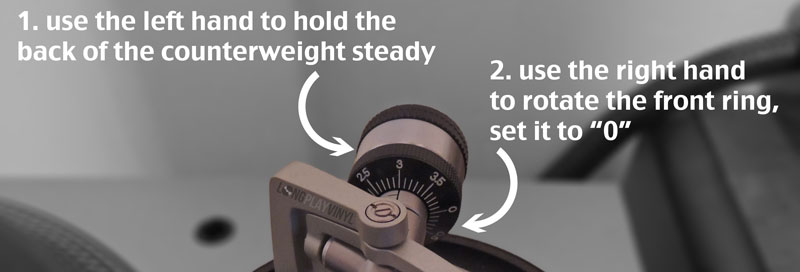
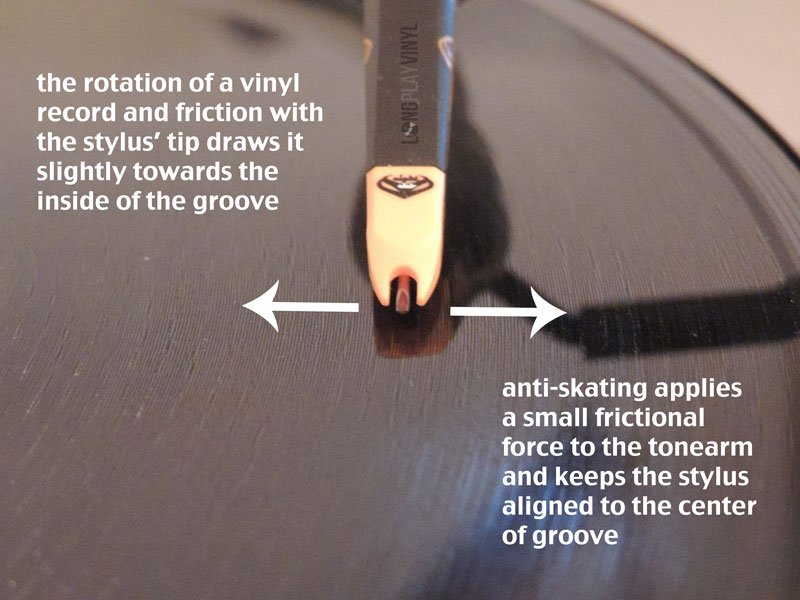
Most high quality turntables shouldn’t be used out of the box. Before playing records you will need to balance the tonearm, set stylus tracking force and adjust anti-skating. I know this sounds daunting but it’s not as complicated as it sounds. This step-by-step turntable set-up guide will get you going in no time. If you’ve purchased a brand new unit it would also comes with instruction for the set-up.

A stylus tracking force scale can be used to verify if the stylus tracking pressure has been accurately set. This will assure the functioning of your stylus, proper sound and longevity of your precious records. A digital scale like this usually costs under $20.

Stylus Needle Cleaner

Cleaning your records with a brush before each play is important. However, it is impossible to keep your stylus completely free of dust, lint and dirt. With time it will get dirty and the sound quality will go down. You can try cleaning your needle with a small soft brush. This is a risky process and you can end up damaging your stylus so you have to be extremely careful. Another way of maintaining a stylus is using a special stylus needle cleaning gel. The original stylus cleaner is rather pricey but has rave review. There are now cheaper versions of this product but it seems like some of them leave a tiny bit of gel on the stylus which can’t be good.

I’d highly recommend going with a trusted product such as ONZOW Zero Dust.

Closing your turntable lid and putting the protective sleeve on the styles when not in use will also help keep the dust away from your turntable and your cart. If you have a lid – use it.

Furniture

Kallax from Ikea

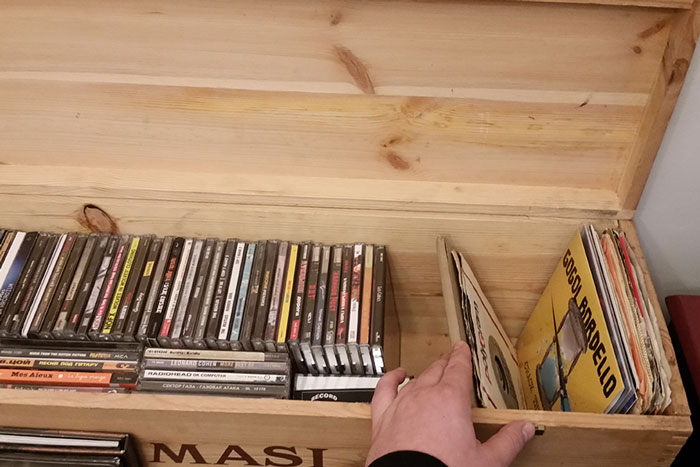
Before setting up your vinyl gear you need to decide on where it will be sitting. Your turntable needs to be on a level, sturdy surface. I am not going to turn this post into a furniture review but this is an important accessory to your setup so I had to mention it. Yes, I do drool over Instagram posts of beautiful mid-century-modern turntable tables and vinyl record storage units. Unfortunately I haven’t found a perfect piece for my home. I am using the most popular piece of furniture for my vinyl set-up, Kallax from Ikea. The 4 cube unit is in my living room and an 8 cube unit is in my basement.

These units are popular in the vinyl community because they are cheap and they accommodate the records. You get lots of vinyl storage as well as a flat and sturdy surface for your audio gear. If you can’t find a perfect piece of furniture, this could be your temporary (or permanent) solution.

Vinyl Records

Once you’re all set with your turntables, amps and speakers you’ll start spending even more money on actual vinyl records. By the way, the plural of Vinyl is VINYL. Try to call them vinyls on Reddit, Facebook or Instagram and the community will eat you alive. Personally I don’t care what you call them but you’ve been warned.

10 years ago most of the records were obtained through a few remaining record shops, eBay, yard sales and a few dedicated websites. Today you can find vinyl virtually anywhere from Amazon to Walmart to Wallgreens and everywhere in between. With the “vinyl renaissance” came higher prices. Most new records will set you back $20-$30 a piece. Used records can cost from $0 to thousands of dollars, depending on rarity, condition, demand and the greed of the seller.

That being said, you must take good care of your records if you want them to live a long life. Unlike digital music, records have a limited number of playbacks. They can also get water damage, heat damage, they can break, crack and get dirty.

Turntable Setup Conclusion

As I mentioned at the very beginning of this article, the passion for vinyl and turntables is not the cheapest one. If you aren’t sure about it or if you’re on a budget, I would recommend a simple and inexpensive setup.

Grab an AT-LP60 turntable and Edifier R128 speakers. For about $200 USD you get a brand new decent setup, with warranty. No need for external amplifier, phono preamps or anything else. This way you get to spend your money on records.

If you’re willing to spend a little more, go for an AT-LP120X and Edifier R2000DB. For about $650 USD you’re getting a lot of sound, quality and possibilities. You can upgrade your cartridge and stylus. Also you can switch off the internal preamp and add an external one if you desire. You can enjoy your records as an audiophile or you can try yourself at scratching and DJing eventually. Although that would require a second turntable and a mixer. If I was to buy a brand new setup – it would be this one.


Resources:

Klipsch Audio

Audio-Technica

How To Use A Carbon Fiber Brush on Vinyl Records

Vinyl maintenance: how to use a carbon fiber brush on your vinyl records

The vinyl record has many known enemies besides the user’s fingers; dust and static charges are common unwanted guests when the groove is trying to do its thing. Even a clean record handled by experienced hands is subject to retain a static charge and attract dust particles. Several instruments and cleaning solutions can be used to minimize or eliminate the issues. An affordable and relatively effective option is the use of a carbon fiber brush, however its correct usage is frequently subject to debate. The following guide explores the different techniques employed by vinyl enthusiasts by weighing the pros and cons of each approach to determine which method works best. Watch our video or keep reading for further information.

New to turntables and vinyl? Check out our detailed guide for beginners!

Purpose of using a carbon fiber brush

A carbon fiber brush is used to remove dust particles and static charge from vinyl records. The two rows of fine bristles are made of a carbon composite that has the advantage of being incredibly fine, sturdy, soft and conductive. Keep in mind a carbon fiber brush is not designed to clean your old dusty records or remove static charge forever. It’s a day-to-day maintenance tool that should be used on clean records with the usual dust particles attracted to it.

vinyl record with dust

Causes of Dust & Static on Vinyl Records

Many factors account for dust on vinyl records; location, climate, the way the records are stored and the cleanliness of the listening room are only a few causes. Dust particles are attracted to the vinyl record mainly by the electrical charge it may hold.

Static electricity is a variance between the electric charges on a given surface caused by the friction with another object or surface. A vinyl record can get electrically charged when it enters in contact with the inner sleeve it’s placed in or taken out from. The record holds the charge until it can be moved along by discharge to another surface. If the record is played, the variance in the electrical charge between the record and the stylus results in loud audible “pop” sounds at different times during playback.

How To Use The Brush

1. Place a record on the platter and start the turntable. Don’t play the record while using the carbon fiber brush. Using the 45 (or 78) RPM won’t get faster or better results.

2. Holding the brush straight, by its body and handle, place it perpendicular to the record groove.

3. Lower the brush onto the record exerting minimal pressure to optimize dust removal and minimize potential damage to the groove or the turntable. The platter should always spin freely.

Hold the brush tight; a spinning record has more force than you’d think!

4. After 3 or 4 rotations, the bristles on the right side retain most of the dust particles; gently tilting the brush on the left side captures the excess dust on the second set of bristles.

Note the first four steps are general consensus among vinyl enthusiasts; the fifth step is where the debate rages on.  The three different approaches are denoted A, B and C.

5. A) Moving the brush toward the outside of the record

This technique consists in slowly moving the brush towards the outside, away from the spinning record.

The downside using this technique, it may leave the carbon fiber brush electrically charged since friction occurs between the bristles and the spinning record.

5. B) Moving the brush toward the label

The second approach involves in slowly moving the brush toward the record label and making contact with the turntable spindle to discharge the brush. The idea behind this technique is to use the turntable spindle as a medium to move the electric charge from the bristles to the grounded turntable.


Two problems may occur when using this method. The first issue; dust particles contained on the bristles are transferred to the record label will end back on the record as soon as the platter spins. Additionally, if fingers come into regular contact with the label, the bristles could get tainted with residues and natural oils our skin produces.

5. C) Lifting the brush upward,

Lifting the brush away from the spinning record is another approach.


Downsides include leaving excess dust on the record and an electrically charged brush.

6. To remove dust caught on the bristles, hold the brush by the handle and move it from side to side. Ideally don’t perform this step close to your turntable for obvious reasons and don’t touch the bristles with dirty or even clean fingers; natural oils on the skin shouldn’t be transferred to the vinyl record.

7. Stop the turntable. Notice if there’s any excess dust on the record.

8. Repeat steps 2 to 7 until satisfied or when the brush bristles are exempt from dust.

Some users remove the remaining dust particles while the turntable platter is not spinning; remember lightly brushing in the same direction as the record groove optimizes dust removal.


Extra Tips on using a carbon fiber record brush:

Always keep the brush perpendicular to the record’s groove.

Always hold the brush by the body and handle.

Always exert very minimal pressure on the brush; the bristles collect dust more efficiently when its tips aren’t stressed into the grooves.

Always use the handle with caution to remove dust caught onto the bristles; the handle’s terminals are usually the most fragile piece on a carbon fiber brush.

Always store the brush in a dust-free case with the handle protecting the bristles.

Never touch the bristles to remove dust with your seemingly clean fingers; even after washing your hands there are natural oils (and whatever soap residue’s left) that our skin produces that shouldn’t be transferred to your favorite LPs.

Never use a carbon fiber brush on dirty, gunky, greasy records; they require a lot more than a simple brushing.

Never put any (cleaning) fluids on the brush or your record; the carbon fiber brush is not designed to wet clean your records.

Never hold the brush at an angle; the body may enter in contact with the record and cause scratches.

Final Thoughts And Recommendations

The different techniques used all seem effective to some extent. Keeping in mind a carbon fiber brush doesn’t do miracles; satisfactory results can be achieved by weighing the pros and cons of each approach and testing which method works best for you.

On a personal note, I’ve been using a Stanton CFB-1 carbon fiber brush for many years with pleasing outcomes by combining two methods. A cheaper brush works as well but I noticed the bristles wearing off much faster.

First I use the “lifting” technique, which consists in lifting the brush upward, away from the record.  Using this method, most of the dust is contained on the set of bristles. Next I remove the dust caught on the bristles by holding the brush by the body, moving the handle from side to side. Placing the brush on the record a second time and slowly moving the brush toward the outside of the record removes the excess dust. Finally while the turntable platter at rest, I take a last look and if necessary, collect the remaining dust particles by lightly brushing in the same direction as the record groove.

After testing the methods above, I came to the conclusion that a carbon fiber brush retains a certain electric charge after use, even if the bristles come into contact with the turntable spindle as shown in this guide.

In case dust and static issues persist, other more expensive approaches may be needed to minimize the effects. Properly wet cleaning your records and using an anti-static gun such as the Milty Zerostat are much more effective solutions. Replacing the record’s generic paper inner sleeves with anti-static inner sleeves also helps. For those living in a dry climate, a low humidity levels in the listening room may cause static, investing in a humidifier is something to consider.

Disclaimer: Please note that some of the links in this post might be affiliate links. This means that at no extra cost to you I will receive a small commission if you decide to make a purchase through this links.

Any questions or comments? Please use the comment form below!

vinyl record storage

How To Store Your Vinyl Records

Whenever someone gets into listening to music on vinyl they might simply have a few records laying around. However as the collection grows, we realize we need to store them somewhere. There are bad and good ways of storing your music and this is the subject of today’s post.

How To Store Your Vinyl Records Properly

Check out this video with all the details and examples:

New to vinyl? Check out our Beginner’s guide to turntables.

1. Keep you records away from direct sunlight and heat sources.

The heat will warp your records and they will become unplayable with time. Make sure to keep your vinyl records away from heaters and other sources of heat. For example my receiver runs pretty hot and the ventilation openings are on the top cover. So I need to make sure to never put an LP on top of the receiver.

Direct sunlight is also a heat source. Additionally, bright sunlight damages the paint on cars over time. Just imagine what it will do to your records! If you value the covers of your records that usually come with amazing artwork then make sure to keep them away from the sun.

2. Storing Your Records.

If you have just a few records you might get away with a box or even a milk crate. Just make sure that the records fit freely into the box without you having to force them in. You don’t want to apply any unnecessary pressure on your LPs.

vinyl record storage

For a bigger collection you’ll need to find a better solution. Ikea’s Kallax (affiliate), formerly known as Expedit shelving units have become a very common record storing solution. They are inexpensive, sturdy, good looking and of perfect size for your records. You can buy them on Amazon, directly at Ikea or even through Craigslist and Kijiji. They come in 1X4, 2×2, 2×4, 4×4 cubes and a few other variations.

If you’re thinking of another vinyl storage solution you’ll need to pay attention to the size. It must be about 12″ deep (30.5cm) and at least 13″ (33cm) tall. It’s also preferable to have a divider every 10″-13″ (25-33cm). The dividers act as supports for your records and help you distribute the weight in a much better way. You don’t want 100 LPs leaning to one side.

It is very important to store your records vertically. Never pile them up on top of each other. Stacking them up will result too much weight on the records at the bottom.

Do not put too many records between the dividers. If you have too many records stacked into a box or a shelf, you will create ring-wear on your covers (that big visible ring in the shape of a record). It’s also annoying when you’re trying to pull out a single record and 3 of them come out.

vinyl records ringwear
Visible ring wear

When you don’t have enough records in your case, they will fall on the side and lean on that last record. Once again, too much weight being applied on a record will damage it.

3. Inner and Outer Sleeves

Outer sleeves are the transparent sleeves that protect your cover. These sleeves are great for protecting your records from dust as well as protecting your covers from dirt and physical damage. When using an outer sleeve, make sure to have the opening facing upward or downwards. If your outer sleeve opening is in the same direction as your cover opening, the dust will get in there. Also every time you’ll be putting your record back on the shelf, there is a chance that the outer sleeve will slip off.

Inner sleeves are usually the paper sleeves that protect your record. These sleeves go inside your cover. Just like with outer sleeves, make sure your inner sleeve opening is facing upwards. The first reason being that when the inner sleeve is facing up it’s actually protecting your record from dust. Also, if your inner sleeve opening is facing in the same direction as your cover opening, there is a chance your records will simply slip out and fall. This has happened to me more than once, before I learned I was storing my records wrong.

Putting your outer and inner sleeves in the same direction as your cover opening is certainly more convenient however it isn’t the proper way to handle your records. If your main objective is convenience then you should probably listen to music on your computer. Vinyl is not a convenient format and if you enjoy and value your records then you must take care of them.

Here are some outer sleeves I like – I always go for the 4mm thick ones for better quality and durability (affiliate)

4. Storing 7″ Vinyl Records

Just like your 12″ LPs, the 7″ records also need to be taken care of. Personally I’d suggest finding a covered box just like the one I show in the video. Most of the 7″ vinyl records will have very cheap and thin paper covers which will rip, bend and wear out. Having a closed box helps you protect them. It will also help you keep your covers looking great since they won’t get faded by the constant exposure to the sun light.

Flipping through your 7″ records is also a lot easier in a good box. I also store my CDs in the same box for convenience.

storing 7" records

I might have missed some details in this post so make sure to watch the video.

If you have any feedback, suggestions or comments, please do submit them in the comment box below. If you want to share your own vinyl records storage solution, tag us on Instagram @longplayvinyl

Sasha

how to balance a tonearm

How to Balance a Tonearm, Set Stylus Tracking Force And Adjust Anti-Skating

Getting the best sound out of a vinyl record doesn’t necessarily require spending a lot on a cartridge. Achieving the highest fidelity from your gear begins with precisely setting key turntable components namely the tonearm counterweight and anti-skating. Proper calibration has many benefits: obtaining a good balanced sound across all the frequency range, an accurate groove tracking, minimal vinyl and stylus wear. The following guide will show you how to calibrate these parts. Plan yourself time as it involves a minimum of understanding, patience and dexterity. Watch or read until you feel comfortable, it’s a skill every vinyl lover should master.

New to vinyl? Check out our Beginner’s guide to turntables and vinyl.

Understand Your Turntable

Stand in front of the turntable and focus on the tonearm area; the long “s” shaped or straight shaped arm holds the headshell with the cartridge stylus at one end and the counterweight at the other. Looking closely at the tonearm assembly and its surroundings, notice an anti-skating dial. These are user adjustable parts and are essential to calibrate the turntable for optimal vinyl playback.

Tone arm assembly

The tonearm counterweight applies force (pressure) to stylus located at the other extremity. Calibrating the stylus force is the general term when referring to this setting. Also called vertical tracking force, it’s simply the weight, in grams, applied by the stylus to the vinyl groove. The ideal weight setting will depend on the cartridge stylus used. Applying too much tracking force will wear out the vinyl record faster as the stylus will “dig” more heavily in the groove. On the other hand, insufficient weight causes the vinyl to sound thin as the stylus doesn’t have enough tracking force to correctly read the groove. The tonearm could also skip resulting in irreversible damage to the vinyl record and stylus.

Tone arm Overview

Next to the tonearm assembly is the anti-skating dial which basically applies a slight frictional force to the tonearm and keeps the stylus aligned to the groove. The anti-skating setting will essentially have to match the stylus tracking force used, unless you are a disc jockey.

Before calibrating your turntable, make sure it’s perfectly leveled horizontally. Some turntables have feet/legs also called insulators used to adjust the height. Placing a level meter on the platter will reveal any tilt; don’t forget that the turntable has four sides, make sure to place the level from side to side and front to back.

How to Balance The Tonearm

In order to set the stylus tracking force correctly, the tonearm has to be balanced first. The balance point indicates that the tonearm applies zero grams of tracking force to the stylus. To achieve balance, the weight must be equally distributed at both ends of the tonearm. Rotating the counterweight adds or subtracts weight. The balance is obtained when the tonearm floats perfectly horizontal without user intervention.

1) Stand in front of the turntable, remove the dust cover and focus on the tonearm assembly area.

2) Locate the anti-skating and set it to “0”. It will ensure that the tonearm won’t move outward while you find the balance point.

Anti-skating dial on turntable

3) Remove the stylus cover if present and take extra precautions not to damage the stylus during the process either by touching it with your fingers or dropping the tonearm on the platter. Don’t leave the stylus cover on, the extra weight on the cartridge will result in an inaccurate tonearm balance.

Stylus cover on

stylus cover removed

4) Hold the headshell by the finger-lift, using the right hand’s index finger on the bottom and the thumb on top. Unclip the tonearm from the armrest with the left hand. The cue lever should stay lowered.

Hold the headshell

unclip the tone arm

5) Lift the headshell and move the tonearm as if you were to play a record from the beginning. Keep holding the headshell by the finger-lift using the right hand index finger on the bottom and thumb on top. Do not let the stylus touch the platter or any surface.

6) While holding the headshell, use your left hand to rotate the back of the tonearm counterweight using this logic:

tone arm counterweight

Finding the balance point requires the user to let the headshell barely enough room (1/4 inch/6.3 mm) between your fingers to see if the tonearm tilts towards the counterweight (back) or the headshell (front) at a given weight.

A clockwise turn decreases tracking force.

A counterclockwise turn increases tracking force.

Counterweight Tonearm

An unbalanced tonearm tilting towards the headshell is a sign that there is too much weight being applied. Slightly rotate the counterweight clockwise to decrease tracking force.

An unbalanced tonearm tilting towards the counterweight is a sign that not enough weight is being applied. Slightly rotate the counterweight counterclockwise to increase tracking force.

Unbalanced tone-arm

Balancing the tonearm can be frustrating, proceed with patience; always turn the counterweight very slightly in the desired direction. Don’t forget that the stylus, the tonearm and its assembly are fragile. At all times be in control of the tonearm’s motion when increasing or decreasing the tracking force. The tonearm is extremely sensitive, any sudden movement from the user part can make the tonearm tilt and cause damage.

If your turntable was set with some tracking force, chances are the tonearm will tilt towards the headshell if you leave the headshell barely enough room to tilt. It indicaties you to slightly rotate the counterweight clockwise to decrease tracking force. The idea here is to apply a perfect weight distribution along the tonearm resulting in a balanced, perfectly horizontal tonearm floating without the user holding the headshell.

Near the balance point, releasing the headshell results in the tonearm floating by itself. The balance is achieved when the tonearm floats horizontally without the user holding the headshell.

balanced tone arm

Once the tonearm seems balanced, inspect it from the turntable perspective. Stand on the right side of the turntable and have the eye levelled to the tonearm. You may need to make very small adjustments before finding the perfect balance point. Remember, the tonearm is extremely sensitive.

8) Return the tonearm to its rest and clip it. If the value on the outer ring of the tonearm counterweight doesn’t align with “0” it’s normal, don’t panic.

Stylus Tracking Force Calibration

Next we will set the stylus tracking force applied to the vinyl during playback. Before going further, refer to your specific cartridge stylus’ instructions for the recommended weight and as you will need the value to accurately set the stylus tracking pressure. Every cartridge stylus model is different, hence the weight needed will be different. Refer to the manufacturer’s instructions for the accurate weight range suitable for your cartridge stylus.

1) Focus on the tonearm counterweight. Notice the values on the stylus tracking force control and the marker line on the tonearm next to it. Make sure the tonearm is clipped to its rest.

2) Use the left hand to hold the back of the counterweight steady. For this step the counterweight should not move from its balanced position.

Keeping the back of the counterweight steady is important to maintain the tonearm balanced.

3) While holding the back of the counterweight steady with the left hand, rotate the front ring and set the stylus tracking force control to “0” with the right hand. Remember, only the front part of the counterweight should rotate. Now the tonearm is balanced and shows a “zero” tracking force.

By rotating the front ring only, we are keeping the tonearm balance and are simply adjusting the setting of the stylus tracking force control to zero. No weight is added, neither subtracted in this step.

counterweight dial

4) To apply tracking force, hold the counterweight from the back and turn it counterclockwise to the desired value. The stylus tracking force control will indicate the weight applied to the vinyl groove.

stylus tracking force

Remember, setting the tracking force too high will wear out your vinyl faster. If the cartridge stylus manufacturer recommends a tracking force range from 2 grams to 5 grams, try setting it around 2.5 or 3 grams and do a listening test. Ideally use a record you know very well.

A thinner overall sound may indicate there is not enough weight, increasing the stylus tracking force will improve the sound.

Louder lower frequencies and distorted sound may indicate there is too much weight, decreasing the stylus tracking force will improve the sound.

5) The tonearm is now perfectly balanced and the stylus tracking force has been correctly set.

How to Set Anti-skating

When playing vinyl, the tonearm moves from the outside of the disc to the inside. Due to the laws of physics, the rotation of a vinyl record and friction with the stylus’ tip draws it slightly towards the inside of the groove. To counter this offset, anti-skating applies a small frictional force to the tonearm and keeps the stylus aligned to the center of groove.

Set Anti-Skating

A general rule of thumb is to adjust the anti-skating to the same value as the stylus tracking force for regular vinyl playback.

Disc jockeys that spin and scratch vinyl might want to alter their anti-skating settings because the stylus might skip during cueing and scratching.

Set anti-skating

Potential issues…and how to fix them!

If the tonearm does not seem to properly balance, the main issue encountered is often related to the weight distribution: the tonearm counterweight is pushed to its limits either too far back or too close to the tonearm assembly. The culprit is the cartridge stylus’ weight… it’s too light. To make things clear, we are not talking about the stylus tracking force weight, we are talking about the weight of the cartridge stylus itself. To correct this issue, headshell manufacturers include a shell weight; a small piece of metal that either sits between the headshell and the cartridge or is attachable on top of the headshell.

If the issue persists, the last option is to attach an auxiliary weight to the rear of the headshell: a small cylindrical shaped metal piece.

shell auxiliary weight

auxiliary weight

If you bought your turntable brand new and a headshell with a cartridge stylus is supplied with the product, then you shouldn’t have any issues as all the necessary parts come packed in the box. However if you purchased a used turntable or are planning to do so, make sure you have all the pieces, or be prepared to hunt them down!

Experiment a little and final thoughts

Now that your tonearm is perfectly balanced, the stylus tracking force and anti-skating are accurately set you can enjoy an optimal and balanced vinyl playback. Remember if you purchase a new headshell, a new cartridge or both you will need to readjust everything.

I strongly suggest trying the guide at least two or three times to be perfectly comfortable with the process and potentially teach others how to properly balance the tonearm, set the stylus tracking force and the anti-skating.

Pushing the experience further, you could do the steps in reverse.

1) Hold the tonearm counterweight from the back and turn it clockwise back to “0”.

2) Set the anti-skating to “0”, hold the headshell and unclip the tonearm.

3) Move the tonearm is if you were to play a record from the beginning.

4) The tonearm should be back to its balance point, floating horizontally.

4) Clip the tonearm back to its rest.

5) Turn the tonearm counterweight counterclockwise to the desired value and match the anti-skating accordingly.

Although not a mandatory tool, a stylus tracking force scale can be used to verify if the stylus tracking pressure has been accurately set. Inexpensive ones can be purchased for about 15$, they do a good job revealing any imperfection.

Stylus force scale

I hope you enjoyed this guide and now can brag about being able to balance your tonearm, set the stylus tracking force and anti-skating.

If you have any questions or would like to add something, please use the comment box below.

Scroll to Top